
What is FBDI?
FBDI is one of the many ways in Oracle Fusion Cloud to do conversions. FBDI stands for File Based Data Import. In cloud environment, FBDI is the best way to get mass conversions done in shortest time. All entities are not provided with FBDI currently in Oracle Cloud. During the Planning phase itself, time and budget calculated based on the availability of FBDI, ADFDI or web services. This is important during the plan and design phase as the write access to Database is restricted for SaaS users (Software as a Service).
Pre-Requisites for FBDI:
2. For Excel, users should make sure the Macros are enabled
3. FBDI for the component should exist in the docs.oracle.com
4. It is better to download the FBDI template which has is of the same version as of the Cloud Environment.
Stages:
2. Preparing data for the template
3. Generating the .zip files
4. Uploading the file to oracle
5. Move data to Interface tables
6. Move data to Base tables
Oracle link:
 |
| Credit: Oracle |
1st Step :Download the Template

2nd Step :Preparation of Data
Open the template and fill values for all Mandatory parameters present in the the excel sheet.

3rd Step :Generate .Zip file
1.Once all the required data is filled. Click on “Generate CSV File” button present on the first worksheet of the template
2.The macro runs and generates a series of csv files zipped into one file. Name the file with an appropriate name for easy reference.

1.Login to Oracle cloud application using username and Password.

2.From the Navigator, click File Import and Export under Tools.

3.Click on Actions ->Upload from Search Results Area

4. Click on Upload and Upload the .zip file from your local system

5.Select Action.It differs from module to module and also from import file type. For work definition import I have selected action scm/WorkDefinition/Import

6. click on Save & close.

5th Step:Load data to Interface tables
1.Click on Scheduled process

2. click on new Scheduled Process and search for Load Interface File for Import.
Load Interface File for Import: This process will transfer data from user defined file to Interface tables.

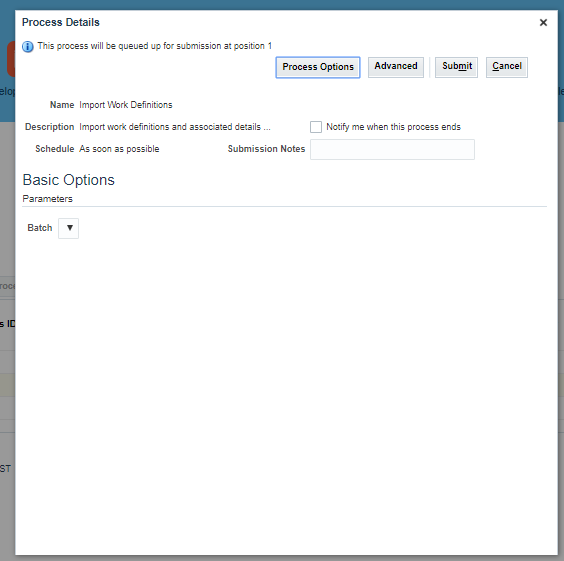
3. Click on 'OK' .You will able to see 'Process details' window.

4.Search Import process and select . To import Work definition our Import Process will be 'Import Work Definitions'. Also select the upload Data File.

5. Click on Submit. If you want to specify any submit notes you can specify.

6.Click on refresh (Highlighted in yellow) to see the status of the scheduled process. The process status will go from ready to wait.

7.If data will transferred successfully to the Interface table it will show "Succeeded"Status.

8.To check the log file just click on corresponding status. You will able to download the log file corresponding to Process ID.

6th Step :Load Data from Interface table to Application Table
Verify that the Load Interface File for Import process completed successfully.Submit the product-specific import process.
To Submit product specif import perform below steps.
1. Go to scheduled process and click on "New scheduled Process". Search product specific process. For us it will Import Work Definitions.

2. Click on "OK". You will able to see below Process details window.
3. For Work Definition Import select batch size and click on submit. "submit notes" is optional.

4.Click on refresh and see the job status.

7th Step: Verify in the Application
Verify the Work definition creation in the Application by searching Manually.
1.Go to Supply Chain Execution Tile.Then click on Work Definition.

2.Click on task . Then under work definition click on Manage work Definition.

3.Below page will come after clicking on Manage work definition. Search manually for the created Work definition.
Note: This is for Work definition Import.


No comments
Post a Comment